

OBS settings for optimal streaming performance and viewer pleasure can be difficult to balance when one is just starting out in the world of streaming. The biggest question that comes up is "what is the best OBS settings for <X>? where 'X' can be a certain game, an Internet bandwidth or a set of computer specs. The unfortunate answer is there is no 'one size fits all' solution when it comes to setting up OBS. The below information may help demystify some of these settings and help you on your way to hitting that 'broadcast' button sooner than you thought.
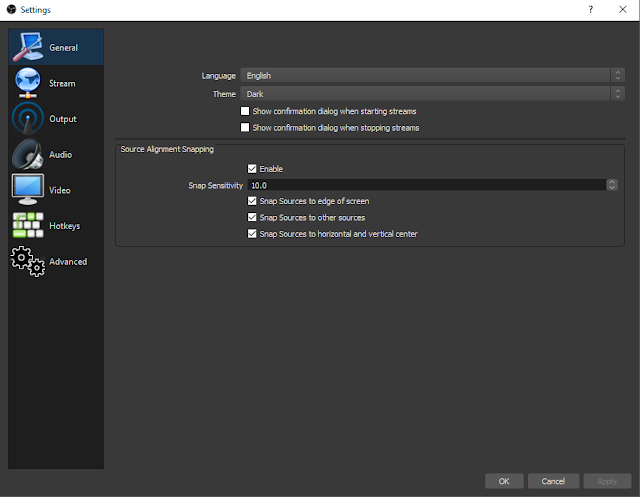
General
Starting out easy. Settings are pretty self-explanatory.
- Language: Set the language localisation
- Theme: Light or Dark themes
- Show confirmation dialog: If you feel like you may accidentally start streaming/recording. This should help you out.
- Source Alignment Snapping: This is for the elements you add to your scenes, such as a webcam or overlays. The elements can be snapped to the sides of the screen, in the centre both vertically and horizontally and lastly you can have elements snap together. The default is set to "Enable".

Stream
- Stream Type: If you are going to be streaming to Twitch/Hitbox/Beam/Youtube gaming you just leave this on "Streaming Services"
- Service: Lots of choices such as Twitch, YouTube gaming, Hitbox, etc...
- Show all services: This gives you a bigger list of streaming services to choose from in the drop down menu.
- Server: Now things can get interesting. Depending on the streaming service you choose depends on what servers are available and where. Your best bet is to choose a server that is geographically closest to you. In the case of Twitch, you may see that there are several options in your general area (such as East or West coast). If you truly want to choose the most optimal Twitch server you may be interested in using the Twitch bandwidth tester provided by Team Liquid.
- http://www.teamliquid.net/forum/tech-support/478845-twitchtest-twitch-bandwidth-tester
- Stream key: You will find this on the streaming website you choose to use, most likely under the settings panel or the streaming services dashboard.

Output
The meat and potatoes of every stream.
- Output Mode: The default is set to "Simple" and it really lives up to it's name. It's too simple. I highly suggest changing this to 'Advanced' so you can start modifying the settings you really need.
Streaming Tab
- Audio Track: The more elements you add which provide audio, the more tracks you end up with.
- Encoder: x264 gives you the best results in terms of picture quality. QuickSync and NVIDIA's NVENC are also options, but the quality is just not there yet for live streaming. NVENC may be an option for those with a weaker CPU for encoding as NVENC will utilize the graphics card. QuickSync is available to those with Intel processors, while NVENC is available for those with NVIDIA graphics cards.
- Enforce Streaming Service encoder settings: Keep this unchecked. There is no transparency on what this option actually does. I have seen no difference with it enabled.
- Re-scale Output: Yes, if you want to re-scale your stream resolution. 720p is a popular rescale option and tends to be a good starting point.
- Rate Control: CBR (Constant Bit Rate) is required for Twitch.tv. VBR just doesn't look that great even though it saves a bit in the bandwidth department if you are playing games with low motion.
- Bitrate: This is based on your internet upload speed. The max setting for a non-partnered Twitch broadcaster is 3500. Hitbox.tv allows higher as well as youtube gaming. The higher the value, the better looking the picture quality. The rub is that the higher you go the more you will alienate audiences which don't have a good internet connection and mobile users. They will be stuck trying to watch a stream which will constantly buffer. Find a happy medium somewhere between 1500-2500 to start with. You can always experiment with other values later.
- Use Custom Buffer Size: Check this off. No need for a custom buffer for streaming.
- Buffer Size: Make your buffer the same size as your Bitrate.
- Keyframe Interval: 2. For Twitch and Hitbox, this must be set to '2'. Other services may vary.
- CPU Usage Preset: Default is Very Fast and for most newcomers, this is where you'll want to keep it. If you have a really power CPU in your computer you can try upping this to 'Faster'. Better yet, if you have a dedicated computer for streaming while you game on a different computer then this value can go higher into the 'Fast' or 'Medium' categories. If you find you are getting warnings about 'high encoding times' reduce this to 'Super Fast' or 'Ultra Fast' to relieve some pressure on your CPU.
- Profile: Main and High. Main is the default and what is recommended for Twitch. High is recommended for Hitbox.tv. So far the internet consensus is that High works, but some mobile users may have issues and are why main is the default.
- Tune: None. Leave this as none. There are a bunch of tuning options such as 'Film' and 'Zero Latency'. If you Google 'x264 tune settings' you can get a breakdown of what each one does and you will see why they don't apply to live streaming very well. Local recordings could be a different story.
- Variable Frame rate (VFR): Keep this unchecked. We want a Constant Frame Rate.
- x264 options: You can use x264 flags if you know them. Most people won't need to touch this as the CPU usage presets determine the x264 flags being used anyways.

Recording Tab
- Type: Standard
- Recording Path: Where your recordings will be saved.
- Generate name without space: If you want filenames which don't use spaces.
- Recording format: MP4 is recommended especially if you are going to be using editing software to cut together something else from your recordings.
- Audio Track: This lets you choose which audio tracks you want to include in your recording. For example, if you want to leave out your Skype audio track from your recording you can uncheck the appropriate track #.
- Encoder: If you are recording on the same computer that you are streaming from then you will want to try using QuickSync or NVENC to record gameplay while x264 does the streaming. NVENC works perfectly fine for recordings.
- Re-scale Output: If you want the resolution of your recorded files to be different than your base resolution.
- Custom Mixer Settings: If you know custom flags to use in this field you can, but most people can probably keep this blank.
- Rate control: For recordings, you can use VBR as this will keep the resulting file sizes a bit smaller. You can also experiment with using ABR (Average bit rate).
- Bitrate: Experiment between 20000 and 40000. The higher end will improve the quality of resulting video, but will also make the file size larger than if you were to use a smaller bit rate. I find 25000 or 30000 to be a good middle ground.
- Keyframe interval: Leave it as '0'. No need to mess with this for recording.
- Preset: These are ranges of latency's VS quality of the video files. I've been using the 'Blueray' option with good results. Try to experiment with what matches your desired video quality with what your hardware can handle.
- Profile: Leaving as 'main' will be fine.
- Level: I leave this as 'auto'.
- Use Two-Pass Encoding: You can check this if you like, but if you are recording and streaming at the same time you may find some performance issues. Two-pass encoding enables your video to look slightly better and has the added bonus of making your video file marginally smaller. I don't use this in order to save on resources.
- GPU: Amount of GPU power to use in recording.

Audio Tab
- Audio Bitrate: 128 is a good place to set this, or 160 if you have the bandwidth to spare and are an audiophile who can actually hear the difference between the two bitrates.
- Name: You can set a custom name for each audio track if you prefer.

Audio
- Same Rate: 48khz or 44.4khz (requires AAC). You probably won't notice much difference between these two. Stick with 44.4khz. If you have Itunes or Quicktime installed then you will have the AAC codec required for 44.4khz.
- Channels: Stereo or Mono
- Desktop Audio Device: Your main desktop audio device.
- Desktop Audio Device 2: Used when you have Virtual audio cables set to separate audio from different programs. An example of this would be having Skype audio in one channel and the game audio in another.
- Mic/Auxillary Audio Device: This will be your default Microphone.
- Mic/Auxillary Audio Device 2: If you have more than one microphone.
- Mic/Auxillary Audio Device 3: If you have more than one microphone.
- Enable push-to-mute: Exactly as it sounds. Set a hotkey to press and hold when you want to mute your mic.
- Push-to-mute delay in milliseconds: The delay in milliseconds for when the push-to-mute executes.
- Enable push to talk: Exactly as it sounds. Set a hotkey to press and hold when you want to talk and have your mic pick it up.
- Push-to-talk delay in milliseconds: The delay in milliseconds for when the push-to-talk executes.

Video
- Base (Canvas) Resolution: Your base screen resolution.
- Output (Scaled) Resolution: This is the resolution you want to downscale your base resolution to. Something to keep in mind is, if you want to stream at 720p but want to record local records at 1080p then you must leave this output resolution left at 1920x1080. If you choose a downscale then that will be the highest resolution you can choose from when setting up your streaming and recording resolutions.
- Downscale filter: Bilinear, Bicubic (16 samples), Lanczos (32 samples). Makes the picture sharper depending on which filter you choose. Most modern computers may only see a small performance hit by using Lanczos filtering. If you are on older hardware, try Bicubic or just stay with Bilinear.
- FPS Values: 29.97,30,48,59.97,60. The frames per second you are broadcasting at. The default value is 30 and it's pretty safe to say that this is where you should stay especially if you are trying to broadcast at 1080p and have a good upload speed. You can look at using 48 and 60 if you are streaming at 720p or lower, but you'll still need a good upload speed. 29.97/59.97 are used if you use a TV as a monitor which only has a refresh rate of 59Hz.

Hotkeys
This is all pretty self-explanatory. You can set up any arrangement of hotkeys as you like for Starting/Stopping Broadcast/Recordings, switch scenes and even hide and show any/all elements that you have added to your scenes.
Advanced
Video
- Renderer: Direct3D 11 is what you want here. The other option is OpenGL which may not perform as well.
- Video Adapter: Never used it.
- Color Format: 'NV12' is perfectly fine here. You can experiment, especially if you are using a capture card as some issues can arise with the default setting.
- YUV Color Space: It's fine to leave this as '601'. If you are having issues with colour, especially when using a capture card, try changing this '701' and see what the results are.
- YUV Color Range: Leaving this as 'Partial" will be good for most people. Yet again, if you use a capture card and are experiencing some issues with colour, try changing this to 'Full'.
Recording
- Filename Formatting: How your filenames for your recorded videos will be named. You also have the option to overwrite a file if it already has the same name. This doesn't really work with the default naming settings as it uses the variable of "seconds" as part of the naming convention.
Stream Delay
Stream delay is used in competitive games in order to help prevent someone from viewing your stream in order to get an unfair advantage on you. This normally shouldn't be an issue as there is already a delay when streaming with Twitch.tv of anywhere from 20-60 seconds. Increasing this delay is useful if you really want to make sure no one is spying on you in order to unfairly get an easy kill on you.- Duration: How long, in seconds, you want your delay to be. The larger the delay the more memory which is required to keep that delay going.
- Preserve Cutoff point when reconnecting: If you get disconnected from streaming and have the option to auto reconnect enabled you can ensure no one misses out on anything which would have occurred during that time period. You must have stream delay enabled for this to work.
Automatically Reconnect
Leave this enabled. This way you can reconnect to your streaming service automatically if something goes haywire with your network or their connection, assuming the issue is resolved by the time the maximum retries has been hit.- Retry Delay (seconds): How long to wait, in seconds, between each reconnection attempt. The default value is fine.
- Maximum Retries: How many times to retry connecting before giving up. The default value is fine here too.
No comments:
Post a Comment